
July 7, 2026
How to Spot a Bad Roofing Job Before You Pay the Final Bill
The outside of a new roof can look fine from the street while hiding installation errors that will cost thousands to fix within 2 to 5 years. Reused flashing, missing drip edge, skipped underlayment, improper nailing, and no ventilation assessment are the five most common corner cuts St. Louis homeowners encounter, and none of them are visible from the ground. Before you make your final payment, walk the property with this inspection checklist. If something looks wrong, it probably is. Addressing it now, while the contractor is still on the job, costs nothing. Discovering it two years later costs $3,000 to $15,000.
What Should I Check from the Ground Before Final Payment?
Start at the curb. Stand across the street and look at the entire roof. A properly installed roof has perfectly straight, uniform shingle lines from edge to edge. Here is what to scan for:
Wavy or uneven shingle courses. Straight lines are the hallmark of professional installation. If you see dips, waves, or shingle rows that are not parallel, the nailing pattern was inconsistent or the crew rushed the job. This is not cosmetic. Uneven courses create gaps where water can infiltrate.
Mismatched shingle colors. Every shingle on your roof should be the same product and color. If one roof plane looks different from another, the contractor ran out of your shingle and substituted whatever was on the truck. This is a code violation in many jurisdictions and a clear sign of corner-cutting.
Sagging rooflines. A new roof should have perfectly straight ridgelines and eaves. Sagging indicates either a framing problem or rotted decking that the contractor should have replaced during the tear-off. If the roofline was straight before the project and is sagging after, the contractor failed to address underlying structural issues.
Visible debris. A professional crew uses ground tarps to catch debris, performs daily cleanup on multi-day jobs, and runs a magnetic sweeper across all paved surfaces and the yard to catch nails. If you find shingle scraps in your flower beds, nails in the driveway, or packaging materials on the lawn, the cleanup was inadequate. Poor cleanup and poor workmanship almost always go together.
What Should I Check Up Close Before Final Payment?
Walk the perimeter of your home and examine the details at eye level and just above:
Drip edge. A metal drip edge should be installed along every eave and rake (the sloped edges). It directs water into the gutter and protects the fascia board from rot. Missing drip edge is a building code requirement in most St. Louis County municipalities. If you can see the raw edge of the roof deck where it meets the fascia, the drip edge was skipped.
Starter strip. The first course of shingles along the eaves should sit on top of a starter strip, a specialized adhesive-backed strip that seals the bottom edge against wind-driven rain. Without it, the first row of shingles is vulnerable to wind uplift and water penetration from the very first storm.
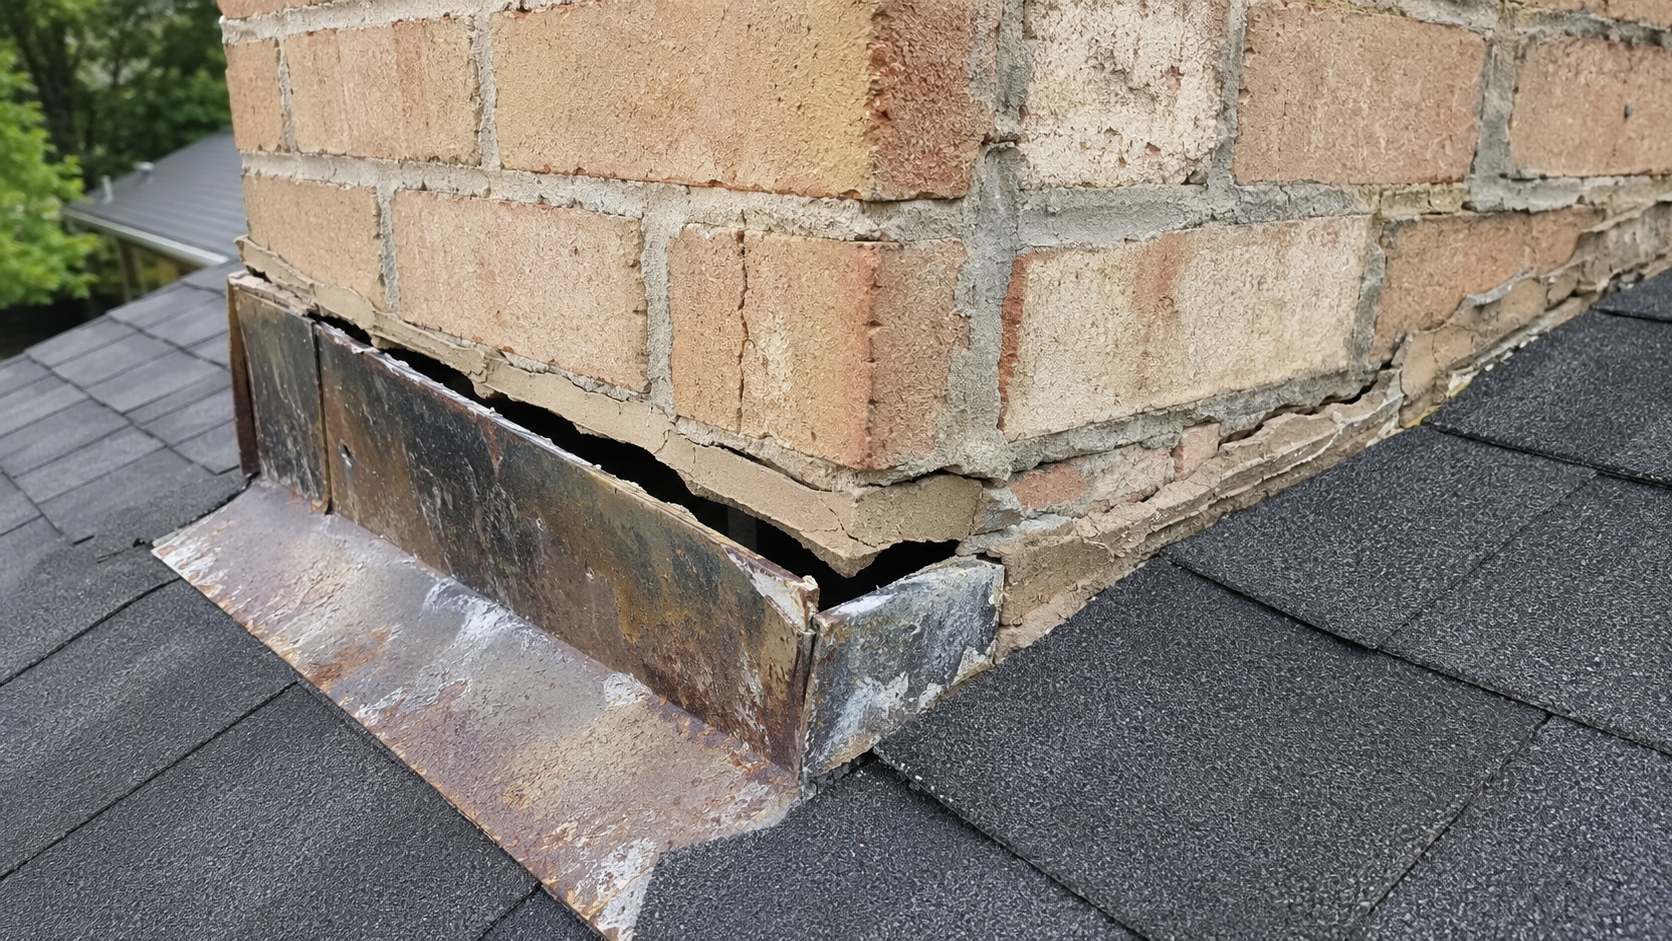
Flashing at walls and chimneys. Every point where the roof meets a vertical surface (chimney, wall, dormer) should have properly installed step flashing (individual pieces that interleave with each shingle course). If you see caulk alone holding the junction together without metal flashing, that seal will fail within 1 to 3 years. Relying on caulk instead of metal flashing is one of the most reliable indicators of a substandard installation.
Pipe boots. Every plumbing vent that penetrates the roof should have a new rubber boot (pipe collar). If the boot looks old, cracked, or dried out on a brand new roof, the contractor reused the old boot to save a few dollars. Pipe boots cost $15 to $50 each and should always be replaced during a re-roof. Old boots are a guaranteed future leak point.
Exposed nails. Walk along the edges and look at the ridge cap. You should not see any nail heads exposed to the weather. Exposed nails are leak points that begin failing immediately. Professional installation means every nail is covered by the next shingle or sealed with roofing cement.
What Should I Check in the Attic?
The attic tells the truth. After the job is finished and before you make the final payment, go into the attic with a flashlight and check the following:
Daylight through the roof deck. Turn off the lights and look for pinpoints of light coming through the plywood. If you can see the sun, water can get in. On a new roof, you should see zero daylight through the deck.
Water stains on the underside of the deck. Dark stains on the plywood indicate that water is already getting through. On a new roof, any staining means something was installed incorrectly.
Ventilation. Look for functional soffit vents (not blocked by insulation), a continuous ridge vent or functioning exhaust vents, and rafter baffles that keep insulation clear of the soffit intake. If the crew did not address ventilation, your shingle warranty may already be compromised.
New decking where needed. If your contractor told you they replaced rotted decking, verify it from inside the attic. New plywood sheets are lighter in color and have visible stamps compared to the original, darker decking around them.
What Are the Most Common Corner Cuts by Bad Roofers?
Across the research, the same installation shortcuts appear repeatedly:
| Shortcut | Why They Do It | What It Costs You |
|---|---|---|
| Reused old flashing | Saves 1-2 hours of labor | Leaks within 1-3 years, especially at chimneys |
| Skipped drip edge | Saves $200-$400 in material | Fascia rot, gutter damage, code violation |
| No underlayment or wrong type | Saves $300-$800 in material | Rapid roof deck deterioration, voided warranty |
| Old pipe boots reused | Saves $15-$50 per boot | Guaranteed leak within 2-5 years |
| No ventilation assessment | Saves time and avoids scope change | Voided warranty, premature shingle failure, mold |
| Layover instead of tear-off | Saves $1,000-$2,500 in labor/disposal | Hidden deck rot, shorter roof life, code violation (3+ layers) |
| No building permit pulled | Saves $208 and avoids inspection | Insurance complications, sale delays, fines |
What Should I Do If I Spot a Problem?
Before final payment: Point out the issue to the crew foreman or project manager immediately. Take dated photos of the problem area. A reputable contractor will fix legitimate issues on the spot or schedule a return visit within days. Do not make the final payment until the issue is resolved to your satisfaction.
If the contractor is unresponsive: Put your concerns in writing (email is fine) with specific descriptions and photos of each issue. Give them a reasonable deadline to respond (7 to 10 business days). Keep copies of all correspondence.
If they refuse to fix the work: Hire an independent roofing inspector ($200 to $500) to document the issues professionally. This report gives you evidence for a complaint to the St. Louis County contractor licensing office, the BBB, or the Missouri Attorney General’s consumer protection division. It also supports any warranty claim or legal action if needed.
Check your contract. Review the written scope of work. If the contract specifies new flashing, new pipe boots, specific underlayment, and the contractor did not deliver, you have a breach of contract claim. This is why a detailed written scope (not just “roofing labor and materials”) matters so much.
Family First Exteriors provides a detailed written scope on every project that lists every component: tear-off, decking inspection and repair pricing, underlayment brand, ice-and-water shield placement, shingle brand and product line, new flashing, new pipe boots, ventilation plan, and cleanup standards. If you need a second opinion on work done by another contractor, we provide honest inspections with photo documentation.
About Family First Exteriors
Family First Exteriors, LLC provides detailed, documented roof replacement and inspection services throughout the greater St. Louis area. The company also handles storm damage and insurance claims, siding, soffit, and fascia, gutter systems, and replacement windows. In business since 2002. A 20% discount is available to veterans, first responders, and senior citizens. Financing available.
15009 Manchester Rd, Ste 261,
Ballwin,
MO
63011
Phone: (314) 255-8151
Request a Free Estimate
Frequently Asked Questions
How can I tell if a roofing job was done correctly?
From the curb, check for straight uniform shingle lines, consistent shingle color across all roof planes, and straight ridgelines with no sagging. Up close, verify drip edge is installed along all eaves and rakes, flashing is new metal (not caulk alone) at every chimney, wall, and vent, and all pipe boots are new. In the attic, check for zero daylight through the deck and no water stains.
What is the most common shortcut bad roofers take?
Reusing old flashing is the number one corner cut, especially at chimneys. Old chimney flashing looks fine from the ground but has degraded seals that fail within 1 to 3 years. Proper installation requires new step flashing and counter flashing at every chimney, wall intersection, and roof penetration. If your new roof has old flashing, it was not installed correctly.
Should I inspect my new roof before making the final payment?
Yes. Inspect from the curb (straight lines, uniform color, no sagging), walk the perimeter (drip edge, flashing, pipe boots, exposed nails, cleanup), and check the attic (no daylight, no stains, proper ventilation). Do this before the final payment. Defects caught now are fixed for free. Defects found later become disputes that may cost thousands to resolve.
What should I do if my roofer did a bad job?
Document every issue with dated photos. Contact the contractor in writing with specific concerns and a timeline for correction. If unresponsive, hire an independent roofing inspector ($200 to $500) for a professional assessment. File complaints with the St. Louis County licensing office, BBB, or Missouri Attorney General if needed. Review your contract for breach of scope.
Is missing drip edge a code violation?
In most St. Louis County municipalities that follow the International Residential Code, yes. Drip edge is required along eaves and rakes. It directs water into the gutter and protects the fascia from rot. Missing drip edge is one of the easiest signs of a substandard installation to spot during a walkthrough. If your new roof does not have drip edge, flag it immediately.
How much does an independent roof inspection cost?
An independent roofing inspection in the St. Louis area costs $200 to $500. The inspector provides a written report with photos documenting any installation defects, code violations, or deviations from manufacturer specifications. This documentation supports warranty claims, contractor disputes, insurance claims, and legal action if necessary.
Need a Second Opinion on a Roofing Job?
Family First Exteriors provides honest roof inspections with photo documentation. If something was done wrong, we will tell you exactly what needs to be corrected.
(314) 255-8151 | Request Your Free Inspection Online
Serving Ballwin, Kirkwood, Webster Groves, Creve Coeur, Chesterfield, Wildwood, Des Peres, Ellisville, Maplewood, and the entire St. Louis metro. 20% discount for veterans, first responders, and seniors.